Want more signups & conversions on your WordPress site? Offer file downloads after form submission! Just create forms that require email to download files.

Approximate read-time: 4.5 minutes
You produce high-value content. And you want that content to drive sales. One way to do that: turn it into gated content. This is a simple method where you require email to download files.
You can then convert these emails into sales through direct content marketing.
According to landing page experts at Instapages, up to 80% of content is gated. Everybody is doing it!
The key is to exchange your content for user data. In addition to email addresses, you could collect job titles, industry info, or anything else that shows the user is a qualified lead.
 What is gated content?
Gated content is online materials like as white papers, reports, or guides that require users to fill out a form before they can access them.
The most popular gated content option is a contact or signup form. You'll see something like "Grab our free marketing eBook when you sign up." Usually, this means users fill out a form to download a file (like a PDF) and must include their email address.
One typical place to find these free download forms is in the sidebar or footer of a website. That way, they're clearly visible but not as disruptive as a popup. We've written about this before in our article, how to include a contact form in your sidebar.
But is this method actually effective? Absolutely! Let's first find out why then learn how to do it.
Read More: How to Create a Winning Email Strategy for your WordPress Blog
Why you should require email to download files
Information exchange is a win-win scenario. You get email addresses to grow your list and your target customers get bonus content for free.
If you're having difficulty growing your email list, gated content could be the best way forward for your email marketing strategy. It lets you provide value to your new subscribers, allowing you to eventually convert them into new customers.
Imagine all the conversions you could be missing out on by not using this marketing strategy. Spoiler alert: it's a lot.
So in order to add these forms to your WordPress site, you have to learn code, right?
Wrong.
In today's post, we’ll show you how to collect email addresses in exchange for gated content using a WordPress contact form or signup form.

Step 1 – Create a download manager form
First, create a new form with the Formidable form builder plugin.
People won't be able to see this form on your site -- it's just for uploading and managing the files you want to give away.
We suggest you title the form "Protected Files" or something similar to make it easier to access it.
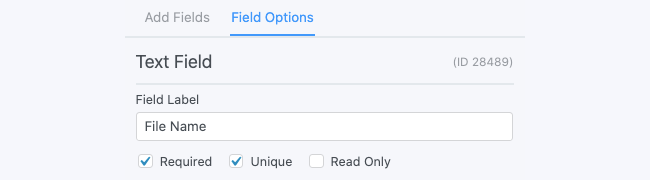
Now you'll need to populate your form with some fields. First, add a Text field, which will be a single line field. Simply title it "File Name."
Next, expand the options of the field and make sure you check the boxes Required and Unique. You can see what it looks like in the image below.
The next field you should add to the form is a File Upload field. This is how it should look below:

Now it's time to save the form, so click Create. When the new form settings load, you can scroll down and see a list of checkboxes.
Check the box that says Protect all files uploaded in this form. To save this change, simply click Update.

Step 2 – Display files with a View
Very important: your new subscribers need to see the files you're giving them. So you'll need to display those files.
You can do this by creating a new View. This is just like when you create a brand new form, except you click on View instead of Forms.
Call your new View "Display Protected File." In the View Format, select Single Entry.
Now it's time for some simple code.
In the content box, you’ll need to enter some HTML:
<a href="[x]">Open [y]</a>
Just make sure you replace [x] with the Field ID of your file upload field and [y] with the Field ID of the File Name field (added in step 1). Otherwise, this won't work.
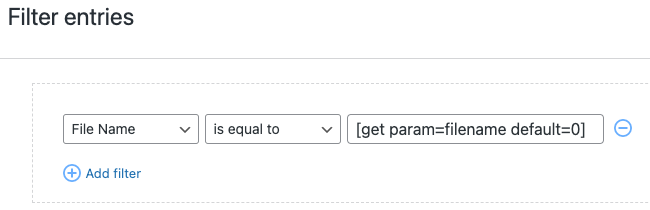
Once you've done that, scroll down and find an option for Filter Entries in the Advanced Settings section.
Add a filter and change the options to File Name field equal to [get param=filename default=0]
Save your changes before moving onto the next step.
Step 3 – Create a form to require emails to download files
Now that the groundwork is in place, let's create the contact form that will appear on your WordPress site. Be sure to include an email address field and check the Required box.
Then feel free to add whatever fields to the form you want.
Step 4 – Display the download file after submission
The next step is to show them the downloadable file after they give you their email address. This is where the whole "require email to download files" idea is put into action.
To do this, go to the Form Settings page for the contact form you already created.
Set the form to Show a Message on submit. This will be a success message, telling the user they've successfully signed up. This message is where you'll display the View where users can download the file.
The View shortcode should look like this:
[display-frm-data id=123 filename="Test File"]
In this code, the 123 stands for the ID of your View and the Test File stands for the File Name. If you'd like to include multiple files, repeat the shortcode with a different file name.
The final step is to update your form, save all your changes, and publish it.
You did it! Now you should have a fully functioning form that requires an email to download a file, giving new subscribers access to your gated content.
Let us know in the comments how this file-download form works for you!
Read More from the Formidable Blog
If you're not already using Formidable Forms, we have plenty of great features to help your websites boost conversions. We offer simple solutions to complex problems. Get started with our free plugin or the full-featured pro version!
The post How to Require Email to Download Files in WordPress appeared first on Formidable Forms.