Wondering how to add a Mailchimp signup form to WordPress? Follow these simple steps to get Mailchimp forms working on your website today!

If you’re struggling to embed a Mailchimp signup form in WordPress, you're not alone! Mailchimp’s documentation isn't very clear.
We looked at it ourselves and were left scratching our heads.  Why isn’t it simple to add Mailchimp forms to your WordPress site?
Turns out, it actually is easy! Really! It’s not nearly as complicated as the documentation makes it seem.
In this post, we’ll show you exactly how to get your custom Mailchimp signup form on a WordPress site. We'll also show you how to use a form plugin to make it even easier.
But before we get started, we need to figure out whether you're using WordPress.com or WordPress.org for your website. That way we can be sure to show you the right steps!
Already a WordPress pro?  Jump down to the how to for your WordPress version!
Are you using WordPress.com or WordPress.org?
The names may be nearly identical, but WordPress.com and WordPress.org are two very different things.
WordPress.com is a web service similar to Squarespace or Wix that makes it super simple to create a website.
You create your account, pick a template, change some colors, and add content.  WordPress.com even hosts your website, so you don’t have to find hosting. At the end of the month, you pay a single fee that includes everything.
WordPress.org, however, doesn’t have these features.
It’s actually just software that makes it a little easier to build a website from scratch.  This means you must find somewhere to host your website and do all the leg work. And you have to pay separately for your domain name, hosting, and any premium themes or plugins.
Even though it is more complicated, most sites run on WordPress.org rather than WordPress.com.
Alright, so now that we've got that straight, it's time to get your Mailchimp signup form on WordPress, whichever version you may have!
How do I add my Mailchimp WordPress subscribe form on WordPress.com?
It's really easy to add a Mailchimp signup form on WordPress.com thanks to the built-in Mailchimp block. Ready for these two simple steps?
Step 1: Insert the Mailchimp block
Select the post or page you want to add your Mailchimp form to and click Edit.
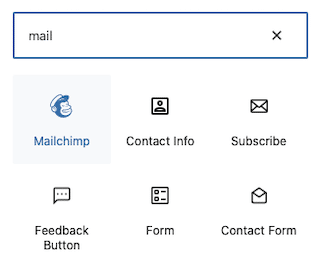
Now, go to the spot on the page where you want to embed the Mailchimp form and click the small + to add a block. Then search for Mailchimp.
Step 2: Connect your Mailchimp account
WordPress will then guide you through connecting your Mailchimp account. Once it's connected, pick the Mailchimp audience you want email addresses to be added to from the drop-down list.
All that's left is to go back to your WordPress page or post and hit Update or Publish. And voila!  Your Mailchimp subscribe form's on your website!
Easy, right?
Pat yourself on the back, you’re done! Not sure what to do now? Check out these tips on how to get more newsletter subscribers and maximize your email marketing campaigns.
How do I add my WordPress Mailchimp subscribe form with WordPress.org?
This is where Mailchimp’s documentation gets confusing. There are two different ways to add a WordPress Mailchimp signup form, but neither is obvious.
- Copy and paste Mailchimp’s embed code
- Use a WordPress form plugin
Copy and paste Mailchimp’s embed code
Each time you make a form in Mailchimp, it generates a piece of HTML code you can insert into your website to display the form.
Uh oh, code.  Don’t worry, all you have to know is how to copy and paste!
It’s quick and easy, but we’ll admit… it doesn’t make the prettiest forms.
First, log into your Mailchimp account and then, under the Audiences tab, select Signup Forms.
Next, choose Embedded Forms.
Once you’ve customized your form as you like, click Continue in the upper right corner.
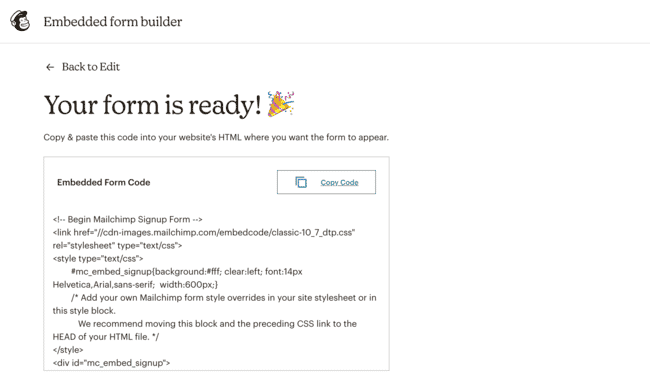
Now you can paste this into any post or page on your website to display your Mailchimp embed signup form on WordPress.
When someone subscribes through this form, they’ll automatically be added to the Mailchimp list you chose.
Not loving the look of your form? 
You may want to use a WordPress form builder to embed your Mailchimp form instead. It’ll give you a lot more control over your form’s design.
Sound good? Then you’ll want to keep reading! 
Use a WordPress form plugin
Technically, there is a Mailchimp plugin for WordPress. But it hasn't been tested with the last three versions of WordPress. So you're taking a security and compatability risk by using it.
Instead, we've got a better option… and it’s even the option Mailchimp themselves recommend.
Believe it or not, installing a WordPress form plugin  is Mailchimp’ #1 option for getting your Mailchimp email signup form onto your site.
And the #1 form plugin? Well, that would be Formidable Forms! But you don’t have to take our word for it. More than 800 happy users have left 5-star reviews of the Formidable Forms WordPress plugin.
Enough about us, though!  Let’s connect your Mailchimp forms to WordPress. And why don’t we make them look amazing at the same time?!
Step 1: Install and activate Formidable Forms
If you don’t already have Formidable, first pick up our WordPress form maker.
Got your license? Great!  Now, let’s quickly install Formidable’s Mailchimp Add-on.
From the WordPress dashboard, go to Formidable → Add-ons. Use the search bar or scroll down until you find the Mailchimp Add-On.
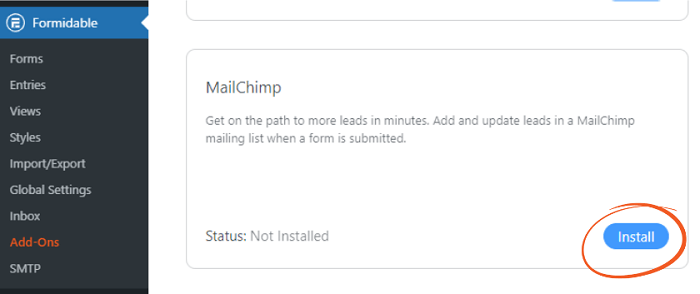
All that’s left is to click the blue button to Activate and then Install.
Step 2: Get your Mailchimp API key
To find your Mailchimp API key, log in to your Mailchimp account.
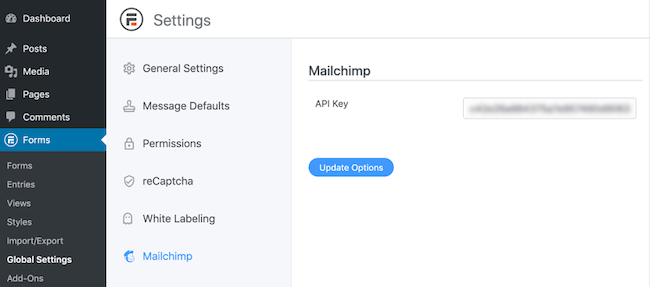
Once there, go to Account → Extras → API Keys. Click Create A Key if there isn’t one already.  Copy your key, and then pop back over into WordPress.
In the Formidable Forms plugin, go to Global Settings → Mailchimp and paste your API key in this field.
Step 2: Create your WordPress signup form
Already made your signup form in Formidable?  Go ahead and skip to the next step!
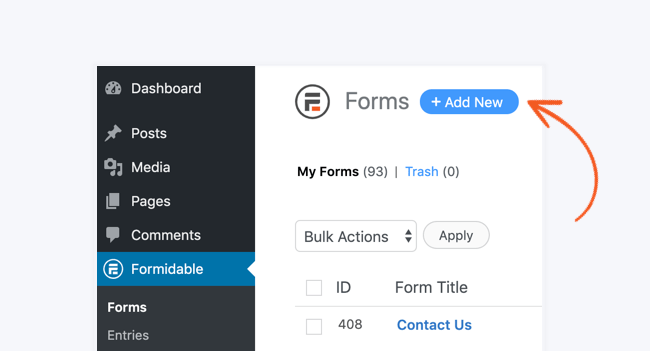
For everyone else, let’s start by heading to Formidable → Forms your WordPress dashboard.
Once you're there, click on the Add New button. Now, you can pick whether to use one of our handy WordPress form templates or choose to build your own from the ground up by picking Blank Form.
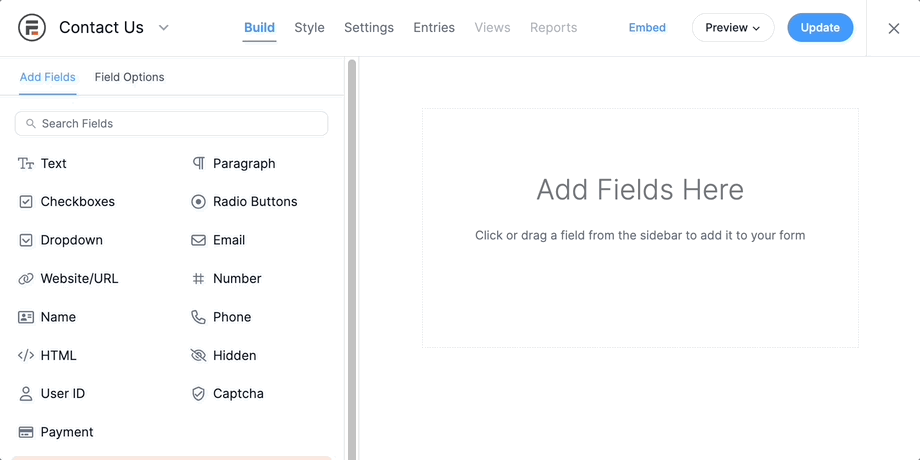
And that's it! You're ready to start building your amazing form using Formidable Forms. Simply drag your fields to the form and customize them.
Have fun and don't hesitate to reach out if you need any further assistance. Happy form building!
Need a little help to making your form? Check out this step-by-step guide on how to create a form.
Just don’t forget to hit Update to save your changes.
Still with us? Awesome!  We’re just two short steps away from getting your subscription form online.
Step 3: Configure your form settings
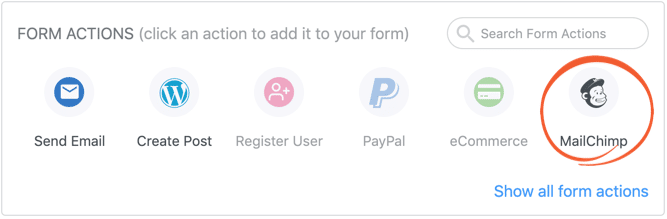
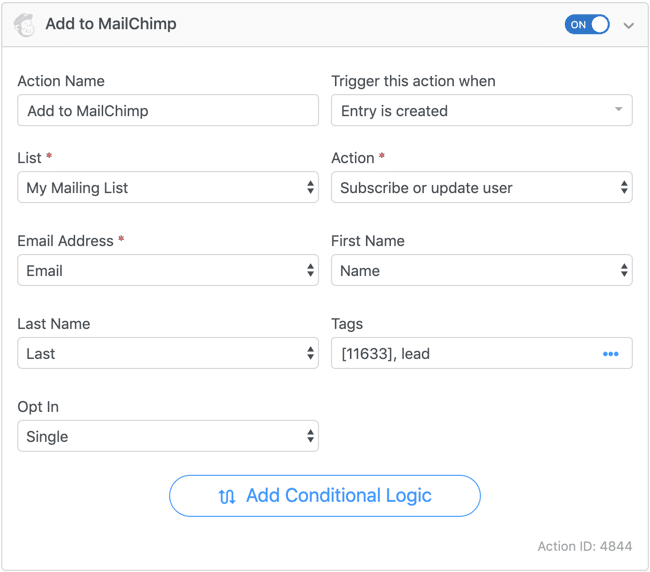
Next, click Settings → Actions & Notifications → Mailchimp.
Now pick the email list to add subscribers to and then match the fields of your form to the fields in your Mailchimp mailing list  (i.e., email address, first name, and any other contact information you need).
From this menu, you can also adjust the form options for your Mailchimp opt-in form in WordPress.
And that’s it! Your form is ready to go! 
You can now add it to any page or post you want by inserting the Formidable block and selecting the Mailchimp email signup form for WordPress you just created.

All set to add your Mailchimp subscribe form to WordPress?
We know it can be confusing to get your Mailchimp signup forms into WordPress, but we hope we were able to help with this article.
Want to take your form even further? Here’s how to create a Mailchimp popup form in WordPress.
And there’s loads more that you can do with Formidable Forms too. 
From making viral Buzzfeed-style quizzes or online calculators, to signing PDFs in WordPress or even creating custom PDFs from form entries, our WordPress form plugin can do it all.
Check out all the features of Formidable Forms for more inspiration. Then pick up your plan and get started!
 9 Best Mortgage Calculator WordPress Plugins for Real Estate
 15 Best WordPress Job Application Plugins (Free and Paid!)
 The Best Constant Contact Plugin for WordPress You Need!