Quantcast
Channel: WordPress Tutorials Archives - Formidable Forms
Viewing all 521 articles
Browse latest View live

From WordPress Contact Form Template to Something Uniquely You

$
0
0

Need the perfect WordPress contact form template? Make sure you don't settle for second best.

Customizable WordPress Contact Form Template

Have you built a form from a template? Did you know a contact form template can get you up and running in minutes, all ready to receive your contact messages? Create your form and insert it on a page in two easy steps.

But is your online contact form your primary source of new customer inquiries? If so, it needs to be perfect. Anything less can negatively impact your business. Jessica wrote about a well-known company that lost millions of dollars a year due to one small flaw in a form. A simple contact form isn't always that simple!

Flexible contact form template for the win

Pre-packaged contact form templates often have a few sticking points. As a web designer, I know better than most that the "one size fits all" approach simply does not work. So any contact form template worth using MUST be flexible and 100% customizable to your unique requirements.

Formidable comes with a few form templates, and the contact form template is probably the simplest. But today I'm going to show you how to take a simple contact form template and modify it to fit your individual requirements, both in appearance and functionality.

Start your contact form from a template

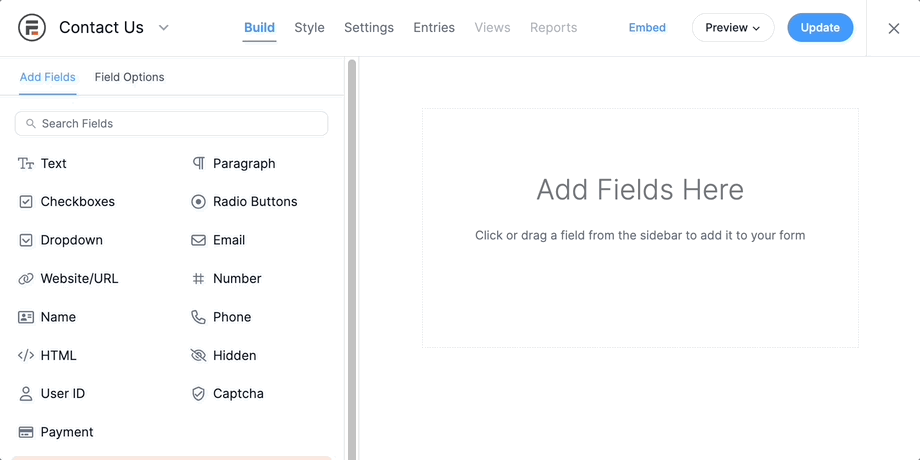
First, go to the Formidable section of the WordPress dashboard and add a new form.

Start a from from a Contact form template On the initial form builder page, before adding any fields, you'll find the option to load a template. The "Contact Us" form is the default option. Select this template and get to work personalizing it.

** Pro Tip ** If your form is sales focused or a point of first contact, keep it as simple as possible. Studies show that the longer the form, the fewer users will fill it out. Only ask for the information you need for the immediate request. You often only need a name, message field, and contact number or email address.

Forms aimed at existing customers (like tech support forms), or forms where there is a perceived value in giving additional information (like quotation calculators) can be longer without affecting response rates much.

Default WordPress Contact Form Template For this example, I'm going to create the simplest of forms aimed at the initial contact with a potential customer. This form includes name, email address, contact number (optional), and a field for the message.

First, hover over the "Subject" field and "Website" field that were included in the contact form template. Click on the trash can icon that appears on the right to delete both of these fields.

Technically separate fields for first and last name isn't required, so in some circumstances the two can be combined. I'm going to keep the two fields separate for 2 reasons: first, the first name field will better personalize the response message, and second, matching up to MailChimp lists is easier with two separate fields.

Next, add a field for a phone number. This will not be a required field as many people don't like giving out their contact number immediately. But if the query is sales related, a phone call response is much more likely to make an immediate sale when compared to an email response.

Finally, because I already have other spam protection in place on my site and I want to keep my form as user friendly as possible, I'm going to remove the reCaptcha field.

Customize the contact form with a three-column layout

Now that the form fields are all setup, it's time to think about the layout. With my background in web design, I've learned to hate random white space on a page, so I want a layout that will be compact, easy on the eye, and fit in perfectly with my other page elements.

I love the "call me back" forms that you see more and more on modern websites because of this simplicity. A single line split into thirds, name - number - submit button. It's super sleek and looks great. But it's much harder to achieve this sleekness with a large "Your Message" paragraph text field. On many modern widescreen themes it just looks too big if you have this element full page width. I like to use sections to achieve a minimalist layout.

Add three section fields to your form. Set each of them to one third page width using the "frm_first frm_third" CSS layout class for the first section, and the "frm_third" layout class for the 2nd and 3rd sections. Remove the section titles and pop into the style settings. Set the section border to 0px so the sections can be used just to achieve a layout, without being visible.

Now that the three-column layout is ready, check the CSS layout class options for all the other fields. Remove anything already in there. Just leave them blank.

Next, drag the First Name and Last Name fields into the first section, the Contact Number and Email fields into the second section, and the Message field into the third section. Remove the descriptions below the name fields so that everything lines up neatly, and then adjust the Message field to be 4 lines high instead of the default 5. Now everything lines up evenly.

The final step is the submit button. Setting this to 100% width gives a symmetrical, minimalist feel that is nice and compact and easy to fit into a page design.

Customized form from contact form template

Make the most of your Contact Form Actions

Just because your contact form looks minimalist, doesn't mean the form actions need to be minimalist too! There are three main steps you can take to maximize the impact of your form and take the process of personalizing the contact form template to the max.

  1. Set your form redirect. Bring users to a page that displays a thank you message along with a selection of your latest products or special offers. Turbocharge your sales by including a time limited coupon code on this page too.
  2. Send an automatic, personalized thank you email. Instead of a boring "Thanks for your message - we'll get back to you" response, use a form action to say thank you. Use the first name field to personalize the subject line and text. Include details of special offers, useful information, and value added promotions in your message.
  3. Add the user to your MailChimp list using the MailChimp add-on. A highly qualified email list is one of the most valuable marketing resources you can have, so don't miss any opportunity to build your list!

More form templates to share

In addition to the form templates that come pre-packaged with Formidable, our team has also built a few custom form templates for download. We'd love to hear your suggestions for additional templates to add to this list.

Have you built contact forms that you're particularly proud of? Export them as XML files and share your amazing contact form templates with the Formidable Forms community. Our users always amaze us with their creations and provide constant inspiration for future projects!

The post From WordPress Contact Form Template to Something Uniquely You appeared first on Formidable Forms.


How to Make a Pizza Order Form in WordPress

$
0
0

E-mail is a tried and tested way to reliably send information and works perfectly for many applications. But what if you need to be notified of an order FAST?

WordPress Pizza Order Form

Are e-mail notifications the best option when every second counts?

Depending on your hosting, e-mails can take up to two minutes to arrive in your inbox. But if your setup relies on relays, or software that periodically checks the server, the delay can be much longer. At times, high server loads or routing issues can mean even further delays. Occasionally, e-mails are even deleted when falsely flagged as spam.

If your internet connection goes down, you lose all access to incoming messages. In a time sensitive environment, you need to be 100% sure that you get all messages as fast as possible, no matter what.

The real-life limitations of e-mail notifications

E-mail probably isn't the best solution. I discovered this when building a website for my favorite local takeaway. My friend Randy had built a local business serving the best traditional southern fried chicken, homemade fries, and freshly made pizza. His big selling point (apart from the fantastic food) was his delivery service. Being in rural Ireland, some deliveries were up to 20 minutes away from the restaurant. He knew that any delay in the ordering system, especially for the customers further away, would mean a drop in his customer satisfaction score. Every second really did matter.

That's why, when he approached me about a website for his business, he wasn't very enthusiastic about online ordering. While it would streamline workflow for his staff and reduce the time spent on phone orders (and mistakes due to mis-hearing an order) - the possibility of an extra delay made it a no-go area. Until I told him about the Twilio integration for Formidable Forms.

SMS notifications as an alternative to e-mail

Twilio uses the power and speed of SMS notifications to make sure you get your notifications as fast as possible. It is perfect for online food ordering.

I'm not going to go into the details of how I set up the forms on that website as every business in this sector is unique. But I will say that I was pleasantly surprised with the resulting user experience using Formidable. Unlike some e-commerce systems where every menu item has its own product page and you have to navigate back and forward to add different items to your order, the single form gives a much simpler and quicker ordering experience. Now that multi-page forms support a progress bar/rootline, it's even easier. Use a page for each of the main menu options, divided up into sections just like the printed menu.

Step one - Plan the pizza order form

Since every restaurant is unique, a tutorial on building this form would probably be too specific, and not apply to most readers. Instead, this is more of a general overview of how it could be done.

I'm going to base this on building a form for a Pizza restaurant. A multi-page order form with one page for each section of the menu will give a better user experience. Use separate values throughout the order form in order to easily calculate the total price at the end.

Page one is the pizza order form with options to customize the size and toppings. Then repeatable sections allow the customer to order multiple pizzas and customize each one.

Also check out the guide on how to dynamically show product images based on selections. Product photos in every section of the form could make it very big and adversely affect the user experience. But used correctly in appropriate places, it can look great.

Pages two, three, and four of my form will be for gourmet burgers and homemade fries, followed by sides and salads, and then drinks. These sections are much simpler, so repeatable sections aren't needed. I'll just use number fields next to each menu choice (that default to zero) and the customer increases the number on the items he wants to order.

Step two - Calculate the order total and checkout

Even with separate values, the final calculation can get a bit complex when a menu has 100 or more items! To simplify matters, use a hidden field for a subtotal at the bottom of each page. If you discover an error in testing, this will make it easier to track down. It will also make is much easier to add and remove menu items. Keeping each form page a sensible size and using subtotals is definitely the way to go!

Once you're happy with the calculations, setup the Paypal Standard add-on or the Stripe Payment add-on to process payments.

The final page will be the checkout page. On the checkout page, include fields for postal/delivery address, email address, cell number for SMS notifications, and a paragraph field for directions for the delivery driver.

Step three - Setup the notifications

One of my favorite things about Formidable payments is the ability to choose when notifications are triggered. Notifications don't have to be sent as soon as the submit button is clicked. Instead, the trigger action can be set to "Successful Payment". This means you ONLY get notified when the order is properly completed and paid for - an essential feature in the food service business if you don't want to give away free pizza every day!

Setup four notifications:

  1. A short SMS to the customer. Thank them for their order, give them an approximate delivery time (30 - 45 minutes), and tell them they will be emailed a receipt.
  2. An email to the customer. Because more info can be included in an email, set this up as a full receipt. Maybe include a time limited coupon code or links to special offers or new menu items too.
  3. An SMS to the restaurant. Include the full order details in the most compact form possible.
  4. An email to the restaurant. A backup in the unlikely event that the SMS service goes down!

Step four - Let your customers know!

An online pizza order form can save your staff time, reduce mistakes, and get orders out for delivery quicker. Don't be afraid to shout about it! Make a big deal about it in your next newsletter. Shout about it on social media. Even get it printed on your napkins!

** Bonus ** Build your mailing list

You already know the value of a highly targeted mailing list for your business. But did you know that your new system to order pizza online can help you grow this list? Use our Mailchimp add-on to capture details from online orders and add customers to your Mailchimp list! Utilizing this list to promote new menu items, seasonal specials or even local events that you're sponsoring can be a great way to boost your sales and increase community involvement.

The post How to Make a Pizza Order Form in WordPress appeared first on Formidable Forms.

The perfect photography contract template

$
0
0

Are you a professional photographer? Need a professional and flexible photography contract template to make your job easier?

WordPress photography contract template form

Professional photography is not your average office job. It's the kind of job where your clients rarely visit your office, because you're always out on location to meet them. You need a professional and flexible photography contract template to make your job easier.

Working with clients who are spread far and wide makes traditional paperwork a little challenging. Have you ever spent hours checking out locations, discussing lighting and shots, and preparing to make a big sale just to discover you've forgotten to bring a printed contract for the client to sign? Even worse, is your pre-written contract unusable because the project is unusual or has specific requirements? There is a solution that should alleviate these frustrations.


At Formidable Forms, we want to help you build the perfect photography contract template - one that is flexible enough to handle diverse projects and all of your clients. We think that something like this needs to be accessible from any internet connected device on the planet. It  should also be something that can be completed 100% digitally (Signature & all!), so you don't have to worry about bringing a printed copy with you each time.

So what would the perfect photography contract template include?

My have a good friend is a professional photographer, so I asked him what a perfect photography contract would need. His answer included the following:

  • Perfect photography contractClient's name, address & contact details
  • Venue/location address & venue contact information
  • Dates, times & locations
  • A detailed shot list and model list
  • Additional notes/conditions for unusual jobs
  • Full terms and conditions - the form will not progress until the "I agree" checkbox is marked
  • Digital signatures for both the photographer & the client
  • The ability to accept a deposit payment online, instantly
  • Email delivery of the completed contracts to both the client & the photographer

If you can think of anything we missed, please mention it in the comments below!


Following are some simple steps for creating this type of photography contract template with the Formidable Forms plugin for WordPress. The process is simple for all skill levels.

Step 1 - Build the main part of the form.

Honestly, if you've used Formidable before, this bit is easy. I'm going to use a multi-page form. Page one will contain basic fields for client details. Page two collects venue details. Page three is where the client can request dates, times, and locations for the photo shoot. Page four collects additional details and variations. Finally, the last page will include the full terms & conditions, signature fields and deposit payment options.

Standard single line text fields will do most of it, and I'll use repeatable sections the shot-list. I'll also use date and time fields on page three, and a paragraph field on page four to allow for any wordy additions to the standard contract. If you were expecting a photography contract template to be complex to build, I think you'll be pleasantly surprised so far!


Step 2 - Conditionally hide the submit button

Terms and conditions are vital in the photography business, so I'm going to make sure this form cannot be submitted until the client agrees to them. I'm going to use a HTML field to display the terms and conditions and below that I'll have a checkbox field with the label "I have read and agree to the terms and conditions". This checkbox field will be the focus of the javascript example here, which hides the submit button until the checkbox is marked: https://formidableforms.com/knowledgebase/javascript-examples/#kb-conditionally-hide-submit-button

Conditionally hiding the submit button is the most difficult step in building a photography contract template. You can get your form ID by viewing the form shortcodes (It's the one or two digit number in the shortcode), and your field ID number is visible when you click on the field with your checkbox, so you can easily modify the example to suit your form. Once you've entered your details, add the javascript example to the "After Fields" section of your Form Settings → "Customize HTML" tab, and you're good to go!


Step 3 - Allow digital signatures

The Signature add-on is one of my favorite Formidable extensions - it gives a simple but effective method to allow digital signatures on any form. Your users may draw their signature with a trackpad/mouse or just type it, so it will work on any device - but just like signing for a parcel, it gives a unique digital input for your form. If your services are high value, you may wish to double check your local laws to make sure that digital signatures are upheld by by the courts where you live, though they are legally binding in many countries.


Step 4 - Setup your form actions

Not every photography project requires the same deposit, so I'm going to include two fields to calculate the deposit payable. First I'll add a number field for "Total Cost", and then a dropdown for "Deposit Amount" with options of 0%, 25%, and 50%. A hidden field will then calculate the deposit payable and forward the amount to my Stripe payment action. You can also use Paypal if you prefer, but I personally find the secure card processing interface that keeps users on your website provides a more professional experience.

Finally, it's time to setup the instant email delivery of contracts. It's important to set the "trigger this action after" option correctly so the contracts are only sent out after payment clears.

I'm setting up two email notifications - the first will go directly to my office and I'm not overly concerned with formatting this to look pretty, the [default-message] shortcode should be just fine. The 2nd email will go to the client, so I'm going to modify the message, add in some HTML and styling to make it look professional and attractive. I would include my company logo, all the details of the agreement, and my contact information in the message. Because this is something the client will see, I want to make sure the email looks as good as the form on my website.

Pro tip - Aggressive spam filters are increasingly blocking & deleting form generated emails that are sent via the standard WordPress system. If you haven't already done so, install and configure an SMTP plugin to send your emails via your main email server, maximizing deliverability of important messages. You may also want to investigate Sendgrid or SendInBlue services if you still experience email deliverability issues.


** Bonus **

A client's email address is a valuable thing and it can be leveraged in your ongoing marketing efforts. You can configure your client email message to include current promotions, optional extras or "recommend a friend" type promotions that can help increase the value of your sale.

Also - if you use Mailchimp, you can use our Mailchimp add-on to automatically add clients to your list and include them in future marketing campaigns.

Don't just build the perfect photography contract template - go one extra step and include the form actions that maximize its impact & generate more sales!

The post The perfect photography contract template appeared first on Formidable Forms.

Life too busy? Meet the smart form that cut 20% off our working day!

$
0
0

Our team has reduced support requests by 20% by simply improving the "New Ticket" form on our help desk. Make smart forms that work for you too.


Smart forms for WordPress

Sometimes, a basic contact form is all you need. But most of the time, a form has a more specific purpose. Spend a little extra time thinking about how your form can save you time. Maybe your form can answer questions without the need to click submit? Design smart forms to guide clients to the answers they are seeking, or collect just the right information to save everyone time.

I've written a few case studies in the past, talking about how correctly implemented forms can streamline your business. Today's case study is a bit special. It is about a company that already knows everything about awesome online forms (Its about us!) still finding new ways to streamline workflow.

Our latest project went "Live" last month, and we're really impressed with the results. Our team has reduced support requests by just over 20% by simply improving the "New Ticket" form on our help desk.

Great support takes time

You may not realize it, but answering questions in the help desk involves more working hours than anything else in the Formidable company. Eight of our team members (myself included) regularly work in the help desk, to make sure that you are well taken care of.

While I love working in the help desk, the number of hours it takes does mean that our lead developers Steph and Jamie can get a bit overwhelmed at times. They should be concentrating on developing new features as much as possible, not worrying about a backlog of support tickets!

A couple of months ago at a team meeting (We do weekly video chats - its pretty cool!), the question was asked, "how can we improve the help desk"?

The objectives were:

  • Make it as user friendly as possible
  • Offer quick links to common issues so users can find a fix without even opening a ticket
  • Show support options relevant to user type
  • Get more information in the initial ticket so the issue can be resolved with fewer responses
  • Ultimately find a way to provide the same high quality support in less time

Initially Jamie, Jonathan, and I each mocked up our own individual ideas. As the project progressed, we combined the best elements of each into one final form.

Smart forms only show the necessary fields — Conditional logic to the MAX!

The first thing Jonathan did was to add a hidden field with a shortcode that retrieves user type, and use this field to conditionally display further options.

For example, we used to get a lot of support requests from existing users who signup for a new account to ask a question. It was nearly impossible to link a new username to the original account (and previous tickets which might help us understand the issue), so it slowed the process of providing assistance. The new form displays a message mentioning this when viewed via a pre-sale account - and encourages paid users who see the message to login via their original account so we can help them faster.

Maximize feedback in your smart forms

We also took a look at past support tickets to categorize them, and we found that a nice percentage were actually saying "Thank You". We love seeing this positive feedback - it genuinely makes my day. But wouldn't it be better if the whole world could see it?

We decided our new form should have an option for "Say thanks" in the primary dropdown. If "Say Thanks" is selected, the form uses conditional logic to display links to where users can leave public reviews on our Facebook page or in the WordPress repo. So not only is the feedback visible to a wider audience - it also means a few less tickets in our help desk.

Smart forms redirect

Smart forms have targeted instructions

Perhaps the biggest change was the "Report a bug" option. We don't like bugs so if one is discovered we want to get it fixed ASAP. A bit of extra information helps expedite this process. We also had a list of common issues that had simple fixes, and we wanted to offer direct links to those fixes within the form.

To do this we added a "Category" and "Subcategory" dropdown to the form. This categorization can give vital clues when trying to track down a bug, but also it allows us data points for conditional logic to display helpful hints. For example, if you select "Emails" in the category dropdown, links to knowledgebase articles for the 2 most common issues are displayed - giving users the information they need to resolve the issue without opening a support ticket!

We believe offering these helpful hints accounts for the majority of the decrease in helpdesk tickets.

Smart forms offer information

If the hints aren't enough to resolve the issue, the new form asks for extra details such as a link to the page where the form/view is displayed, a copy of the exact error message, the version numbers of Formidable and WordPress that are in use etc. Having this extra information upfront allows us to find a resolution faster, with less replies backwards and forwards!

Smart forms guide users to extra resources

We also wanted to recognize the support we get from the Formidable community. Our community website is still relatively new, but it is growing every day and becoming a great resource. We wanted to encourage this growth, and especially promote the creative (and sometimes downright genius) tips and tricks that our users are posting there, so we added a "Leave a helpful tip for others" option to our form. When selected, a message appears directing users to our community site.

This means a few less tickets in the helpdesk, and more importantly, useful information in a place where its easier for everyone to see it. We already have 8 pages full of user created tips and tricks - why not check it out now?

The impact of smart forms in WordPress

So how are these changes affecting the Formidable team?

Its early days - but after the first week we checked the stats and saw an immediate reduction just above 20% in new support tickets being opened. For us, 20% is HUGE!

In a team where 8 people are regular on the help desk, this means a lot of extra time for building new features and working through the huge wishlist in development road map - which ultimately means an even more amazing version of Formidable for you!

** Bonus ** Top tips to get the best support

Here are my top 5 personal tips when opening a new support ticket - help us to help you faster:

  1. Give as much detail as possible about your issue, including specific steps to reproduce it.
  2. Let us know what versions of WordPress & Formidable you're using - if they're not the latest, then update,.. its the first thing we'll ask you to do & it often resolves issues without further action.
  3. Give us a link to your form or view so that we can check it out straight away.
  4. If your form/view is on a password protected page, please remember to give us a temporary password to see it!
  5. Include an XML export of your form/views/entries with your ticket. This will allow us to try your form on our own testing sites and help us figure out the issue quicker.

The post Life too busy? Meet the smart form that cut 20% off our working day! appeared first on Formidable Forms.

WordPress not sending emails? SMTP to the rescue!

$
0
0

Have your WordPress form emails have been a source of frustration? Worry no more. This 3 step guide will show you how to avoid the biggest email pitfalls!


WordPress not sending emails? Setup SMTP for your contact forms

Help! WordPress is not sending emails!

We already have a troubleshooting guide for WordPress email issues, but we want to go into a little more depth on this subject. Here's a step-by-step guide on how to setup SMTP on your website, and a little insight into the reasons why SMTP has become an essential part of modern WordPress websites.

SMTP vs wp_mail

SMTP stands for "Simple Mail Transfer Protocol". It relies on a connection to an external mailserver to send email messages. This requires some setup and configuration, but has some huge advantages and is definitely worth the effort!

WordPress has email functionality in its core with the wp_mail function. It's simple, requires zero configuration, and worked reliably for years.

Why do we need SMTP?

Email SPAM and how it affects you

Your messages used to send using the built-in WordPress email system. But why is WordPress not sending emails anymore? The simple answer is spam, and our fight against it. Email spam reached epic proportions in 2010. Since then, the largest and most clever internet authorities have been cracking down hard on spam email, introducing systems to identify it and delete it before it hits your inbox.

are spam filters blocking your wordpress form emails

Email spam is at a 10-year low, falling to 49.7% in June, according to security company Symantec. This was the first time in a decade that spam made up less than half of all emails. Overall, average spam rates annually have been on a downward trend.*

While crackdowns on spam email are good news in general, it is hard for automated spam filters to reliably distinguish genuine messages from spam messages. Unfortunately, messages sent via WordPress mail often trigger spam defenses and instant deletion. Sending messages via SMTP and a known mailserver helps your form-generated messages look more legitimate and reach their destinations intact.

Emails sent through your web host

Under default conditions, your WordPress emails are handled by your web host. Once WordPress or a plugin on your site triggers an email, the control goes to your web host. Some web hosts are definitely more reliable than others, but even the best of hosts will not have 100% reliable email notifications.

Shared hosting is one area where issues can arise. There may be thousands of domains using the same IP address and mailserver - and all it takes is for one unscrupulous user to start spamming - or even one hacked site to go unnoticed, and the reputation of all messages sent via that server can take a hit.

I've also personally seen messages rejected by mailservers on .gov domains which may have tighter security than normal, even when messages sent from the same mailserver were delivered successfully to all other addresses on the list. If you do business with government or security agencies, you may have experienced similar frustrations.

The issue can be compounded further in some cases. Bluehost uses separate servers to send emails from heaps of shared servers. These email servers are limited on the number of emails they can send out per minute. If one of the thousands of sites using Bluehost decide to send out a large mailing, everyone else suffers with email delays.

SMTP completely bypasses your web host, so you are no longer at their mercy. When the WordPress email is triggered, it goes to your email provider rather than your web host. They specialize in reliable email, so your chances of deliverability are far, far higher.

What you need to know about switching

First, it's easier than you think. Once you've found the right settings from your mail provider, the whole process can be completed in 10 minutes flat. It is a completely "set and forget" solution. You won't need to go back and adjust settings on a regular basis.

Second, your users won't know anything has changed. It won't negatively impact the user experience. In fact, if they now get all your messages reliably, it could have a huge positive impact!

Third, you're going to have to do this sooner or later.... So why not do it now?

Getting started - Choose your SMTP plugin

There are hundreds of SMTP plugins to choose from. I've yet to find one that didn't work as expected. However, my personal choice is usually "Postman SMTP" because this plugin logs all messages when they are sent. These logs are handy for troubleshooting issues or re-sending messages at the click of a button when required. This tutorial is based around the Postman SMTP plugin. But the settings are fairly similar in most other plugins too.

Login to your WordPress dashboard, click on the Plugins tab, select "Add New" and search for Postman SMTP. When you find it, click install, and then activate.

Step 2 - Find your SMTP settings

Your SMTP settings depend on the email service you use. You will always need your email address (username) and your email password. You also need to know your mailserver name. In most cases the default port numbers work without modification, but take note of the port numbers your service provider specifies just in case there are issues.
A quick Google search will uncover the settings for most major providers.

If your email address is connected to your domain name, eg. nathanael@mydomain.com, then you can usually find your SMTP settings in your hosting control panel.

*Pro Tip* For self hosted email mailboxes, adding "mail." before the domain name usually gives you your mailserver name, eg. mail.mydomain.com, and the default port numbers (25 or 465) usually apply too.

Step 3 - Configure Postman SMTP

Configure Postman SMTP plugin for WordPress Configuring the plugin is easy once you have all your information on hand. Once the plugin is activated, a new item will appear at the bottom of the Settings menu. Click on the 'Postman SMTP' menu to see the current status, a count of how many emails have been delivered, and a link to the email log.

If you are using Gmail, Yahoo, Hotmail or any of the other main email providers, it's often easiest to use the Setup Wizard option, and enter your details on each step. This process is self-explanatory and the system takes you through it step by step. If it won't work for you, follow the instructions below to manually setup your details.

SMTP settings to integrate with Formidable
If you use a self-hosted email mailbox, or an SMTP service like SendInBlue to send messages, the "Show All Settings" option allows you to manually enter your information.

I'll set up using the SMTP option. If you use Gmail, Mandrill, or SendGrid, this plugin supports their API's directly. If you'd like to connect via API, follow the author's instructions.

  1. Choose "SMTP" in the dropdown menu, and then enter your mailserver name, port number and from-address details.
  2. Next, select your Authentication method in the bottom dropdown and enter your email username and password.
  3. You'll also need to fill out your name, envelope from-address and reply-to address details on the Message tab, BEFORE you click "Save Changes".
  4. Usually the default settings on the Logging and Advanced tabs do not need to be modified.
  5. Finally, on the plugin home screen click the "Send a Test Email" link to verify that your settings are correct and your emails are working.
  6. Check your inbox, and smile. Setup is complete!
  7. Bonus step - integrate with SendGrid

    SMTP is instantly better than WordPress/PHP mail. But it has its limitations. Every email provider has caps on the number of emails you can send per hour and per day. This means you most likely cannot send batch emails. Your limits will depend on your email provider. Here's a great compilation of email hosts and their limits.

    For maximum deliverability without limits, integrate with SendGrid or a similar SMTP service. Personally I use SendInBlue. Their entire systems are built with email delivery in mind, and optimized to ensure that your messages reach their destination every time.

    Our next tutorial will give a step-by-step setup guide to connect your WordPress emails to the SendGrid transactional email service.

     
    * Source HERE

    The post WordPress not sending emails? SMTP to the rescue! appeared first on Formidable Forms.

Boost email delivery with SendGrid

$
0
0

Are your email delivery rates less than 100%? Take the 15 minute challenge, setup SendGrid transactional email, and relax knowing you're in good hands.


ultimate email delivery - Formidable and sendgrid transactional email

Already using SMTP? Why use a transactional email service?

Sending your WordPress form emails via SMTP means that the worst of your email woes are behind you. But are you hitting email provider limits?

For many Formidable users, EVERY single message is vital. Anything less than 100% email delivery is not good enough! To ensure you get as close to 100% as possible, consider using a transactional email delivery service like SendGrid.

When does your email provider SMTP fall short?

Gmail and other email providers send reliable emails. But only when you are sending less than 500 emails per day. This limit is different for each provider, but once the limit is reached, no emails will be sent.

When a single undelivered message could cost your business money, it makes sense to take extra steps to ensure success.

SendGrid VS SendInBlue

I personally use SendInBlue. I don't send many emails, and SendInBlue offers a free plan for users who send less than 300 messages a day. SendInBlue's services are aimed more at sending email lists (like a supercharged Mailchimp) than direct SMTP, so new users need to manually request access to send with SMTP.

SendGrid's services are aimed more at direct email sending, either via their API or using their optimized SMTP service. This makes setup a bit simpler and quicker. Their main offering starts at $9.95 a month with a limit of 40,000 messages per month on their basic plan.

Put the SendGrid 15 minute setup to the test

Let's check to see if the famous "15 minute setup" that SendGrid boasts about is realistic. Gather your email details and set your stopwatch.... GO!

Step 1 - Signup at SendGrid.com (1:00 pm)

signup for sendgrid SMTP service
This part is easy. I selected the "Free 30 day trial" option, chose a username & password, entered my email address, completed the reCaptcha, and clicked submit. The next page asks for some additional info, but nothing out of the ordinary - just first name/last name, company name, website address etc etc - the work of moments to complete.

Step 2 - Verify email address (1:02 pm)

As soon as the account page loaded, there was a big prompt at the top of the screen about verifying my email address. Until you verify you are limited to sending max 100 emails a day, so I quickly checked my inbox and clicked the link.

Step 3 - Choose SMTP setup (1:05 pm)

chose your setup method, SMTP or API
Next I saw options for sending messages, with a choice of using API or SMTP. My last tutorial covered SMTP, so you should already know how to enter your details into your SMTP plugin. If copy your credentials to your SMTP plugin and email clientyou use "Postman SMTP", this plugin supports the API directly too, so you can choose either option. I chose the SMTP option. I named my API for the first step, and all the SMTP details I needed were shown below.

Step 4 - Update settings in my email plugin and email client (1:08pm)

I opened up my WordPress dashboard and navigated to the settings for my SMTP plugin, and copied all the info over - but why should the goodness be limited to my website? In just 2 or 3 minutes I'd also opened up my email client (I use Microsoft Outlook - but don't judge - I'm old school) and updated the SMTP settings there too, giving improved delivery rates for ALL my emails!

Step 5 - Send a test email (1:13 pm)

I sent a quick test email from my computer - counted to 10, and hit the "Verify Integration" button on the screen... and hey presto, I'm all setup and ready to go - simple as that!

success. Formidable messages are sent via sendgrid

The SendGrid verdict

I'm impressed! Remember I usually use SendInBlue. This was my first time ever setting up with SendGrid. Even so, it was simple, intuitive and very quick to complete - 13 minutes from start to finish, with a couple of short interruptions for screenshots within that time too!

If your business relies on email communication, and you've experienced the frustration of undelivered messages - now is the time to act. Check out SendGrid or any of the multitude of transactional email alternatives. Take 15 minutes out of your day to switch. I can tell you from personal experience that you will not regret it!

The post Boost email delivery with SendGrid appeared first on Formidable Forms.

How to use your Forms to make a WordPress Job Board

$
0
0

Did you know that Formidable can be a WordPress job board plugin? Harness the power to create your own WordPress Job board.

wordpress job board plugin with Formidable power

Our Formidable Demos page includes a WP job manager demo. In this tutorial, we'll show you how to use the power of Formidable Forms to create your own WordPress job board. No extra plugin required.

Features of a job manager

WordPress job manager Build a system where users can view all job listings, apply for jobs, and add a new job listing. Plus, search for specific jobs by category, pay, location, and title.

The demo job board has four main parts:

  1. The form to add new job listings
  2. The view to display job listings
  3. The form to search job listings
  4. The job application form

Step 1: The job manager form

If you've built forms, then this bit should be child's play for you. Add fields for Job title, Full time/Part time (dropdown), Salary, Job description, City, State and any other fields that you need.

Your exact fields will vary depending on your specific need. Make sure to think ahead to the search form, and include the essential fields that people would like to use to search and filter (like location and job sector).

Step 2: The job listings view

Views can be a little intimidating if you're new to Formidable. But one basic rule makes it much simpler. The rule? Everything in the Before and After content sections is used only once on the page. The main Content box in the middle is repeated for every entry. This allows you to setup your table/layout structure in the Before section, add the content you want to display in each row in the Content section, and close your tags in the After section.

This demo uses a Dynamic View format. This means that you will have BOTH the listing view that displays the main details of each job, with a detail link for an in-depth look at each individual job. To achieve this, we'll use the "detail page" box to define what details are visible in the detail view. Because the detail view is a single job and not a list, there are no Before or After content boxes.

Want a detailed explanation on how to setup a view? Or if you would like to duplicate the Job Board demo exactly, copy the sample View code or download the job manager demo.

Step 3: Search posted jobs

At this point, add a few entries so you can double check that your view is displaying the way you would like. Confirm that the form returns results with search tests.

You don't need to include every field in your test searches. Input only relevant fields in the search form, like Job Sector and City. Be selective about which fields you include in your test searches. Try various options to see which combination returns the most relevant results for your audience. It's worth spending extra time on this, as it's a huge factor in how user-friendly your job board will be.

TIP: Use dropdown fields in your application form and corresponding fields in your search form to allow users to effectively filter results. This often returns more relevant results the first time when compared to results from a text search.

Want more information on Formidable search forms? See how to create a search form.

Step 4: Job application form

The job application form is the final part of the puzzle. The shortcode for this form needs to be embedded in the "Detail Page" content so that the "Apply Now" button is visible in each jobs detail listing.

This job form can be pre-populated with the job title and other relevant details using the [get param=whatever] shortcode. This shortcode helps to display information to your users and automatically link forms by passing information through the URL.

Bonus Step: Ease of use

Make your forms more user-friendly. Modify the success messages and include a link back to the job listings page. You can do this in the form that adds new jobs, and the job application form.

As you can see here, a link back to all listings keeps the success message from being a dead end.

Use Formidable Forms as your job posting software

Not using Formidable yet? Or looking to download the prebuilt job board template? Get started with the best WordPress forms plugin or renew your account today.

The post How to use your Forms to make a WordPress Job Board appeared first on Formidable Forms.

How to make a Contact Form Slider in WordPress

$
0
0

Is your WordPress contact form taking up too much space on your page? See how to slide in your contact form with the click of a floating button.


How to make a Contact Form Slider in WordPress
Forms are amazing right? They look great & have more functionality than you could have imagined. Forms built with Formidable can take orders in your shop, upload properties to your real estate website, and create guest posts in your blog. There's no downside. As long as you have enough space to display your forms....

Visual space is a premium

In this new connected world, there's barely a device that isn't connected to the internet. Not just your smartphone, tablet and PC anymore. Now you can buy an internet connected toaster, or browse the latest news on your fridge. (Not your microwave—that's fake news!)

Your form has to look great on a massive variety of screen sizes, especially small phone screens.

Add a Contact Form Slider to save space

How do you get your forms to display prominently where you need them, without overwhelming the layout on a small screen?

In this short tutorial, I'll show you one of my favorite plugins to use in conjunction with Formidable. It's called WP Contact Slider.

This simple but effective plugin adds a floating contact button to the side of your screen. When the button is clicked, a panel slides out to display your form. So the screen space is only used when it is required!

Let's get started.

Step 1: Build your WordPress contact form

I'm going to assume that you already know how to build a contact form, so there is no need to go into detail about that. Just bear in mind that the contact slider is probably not suitable for large, overly complex, or multi-page forms.

This solution is great for short forms like customer feedback, product inquiry, or contact forms. If you want to push the limits, be sure to check the result on a variety of devices and screen sizes to make sure it displays properly.

Step 2: Install WP Contact Slider

Simply go to your WordPress dashboard, click on the plugins tab, and search for WP Contact Slider. Then install and activate it. It's free, so there's no registration/payment or even signup to use it.

Or you can download WP Contact Slider from the WordPress repository and upload it to your site.

Step 3: Add your contact form shortcode into the slider

Add contact form shortcode into the slider After you install WP Contact Slider, a new menu item will appear in your WordPress dashboard. Select WP Contact Slider > Add New Contact Slider to continue.

At the bottom of the page you'll see the Shortcode box. Simply enter your Formidable Forms shortcode here, and leave the Type option set to 'none' since Formidable shortcodes do not require any special treatment or formatting.

You can also select the posts and pages where you would like the button to appear. Select the screen placement (right or left), and decide if you'd like the button included on small screens.

Once you choose your preferred options, click 'Update'. Then visit your site to make sure that the slider button is loading correctly.

Step 4: Choose eye-catching colors for your slider button

contact form slider button colors While you want to free up valuable screen space, you don't want to hide your form completely. Set a bright and eye-catching color scheme for your button that compliments the style of your site.

Personally, I often go for a primary color as the background with white text. I find this looks great even on small screens.

That's it. In fewer than 10 minutes, your beautiful WordPress contact form is accessible in a prominent position on every page and post of your website, without sacrificing loads of screen space. Add a contact form slider to your website today!

Step 5: Share the love

We know a lot of work goes into building, maintaining, and supporting a WordPress plugin. So when we come across a developer offering something like this for free, the least we can do is say "thank you"!

Pop over and leave a glowing review on the WordPress Repo, and let the developers know you appreciate their efforts! Good reviews are very encouraging and result in better support and more motivated developers.

While you're at it, let everyone know that you love Formidable too. We love 5-star reviews!

The post How to make a Contact Form Slider in WordPress appeared first on Formidable Forms.


How to make a MailChimp contact form for WordPress

$
0
0

Start building your email list today. A MailChimp contact form will instantly add your form leads into your email list.

How to make a MailChimp contact form in WordPress

Adding MailChimp integration in WordPress is a simple step you can take to maximize the potential of your contact form. This one small change allows you to build a highly qualified list of people who are interested in your business. You can then send out promotional messages, and even customize them with each individual user's details. Old timers and newcomers, think of this as a high tech mail-merge function! Still not sure if you need an email list? Read more about why you should send your leads directly to MailChimp.

How easy is it to add MailChimp to existing contact forms?

The Formidable MailChimp add-on allows you to integrate this extra functionality into your existing contact form in a matter of moments. From start MailChimp for WordPress contact formsto finish setup should take less than 15 minutes. Most of that time is creating an account with Mailchimp.com. So why wait? Follow these 5 steps right now and see how quickly you can bring your contact forms into the 21st century!

Step 1 - Signup for a MailChimp account

It is very easy and only takes 4 or 5 minutes to sign up for a new MailChimp account. Be sure to verify your account, enter your organization info, and create a new list that your form will connect to.

Step 2 - Find your MailChimp API key

You can find your API key by logging into your MailChimp account, and going to Account → Extras → API Keys. Click "Create A Key" if you don't have one already. This key is needed to create a link between MailChimp and your contact forms. So keep this tab open for a few minutes, since you'll need this key in step 4.

Step 3 - Install the Formidable MailChimp for WordPress add-on

To install the Formidable MailChimp add-on, download the MailChimp add-on. If you already have a license key for the MailChimp add-on, you'll find it on the downloads tab in your account page. Then go to your WordPress dashboard -> Plugins page, and click "Add New" and upload. Once uploaded, activate the plugin. Next, enter and save your license key on the Formidable → Global Settings → Plugin Licenses page.

Step 4 - Insert your MailChimp API key to connect your account

Next, go into your WordPress dashboard → Formidable → Global Settings and click the MailChimp tab. Insert your MailChimp API Key from step 2 and click the "Update Options" button. Your website is now connected to your MailChimp account. How simple was that?!

Step 5 - Add a MailChimp form action to your contact form

MailChimp for WordPress forms settings

The final step is to add a MailChimp action to your existing contact form. Find your contact form, click on Settings → Form Actions. Here you will notice a new action is available: Add to MailChimp.

Select the MailChimp list that you would like to add subscribers to. The list you created in step 1 should be visible in the dropdown. Select the Email Address, and any other required options. The options that show up here are determined in your MailChimp list settings. For more details on these options checkout the MailChimp knowledgebase article.

I have a MailChimp contact form for WordPress. Now what?

Having a MailChimp contact form is just the start. The next big challenge is to make sure your form converts as many visitors as possible so you can build your mailing list FAST!

Check out our other recent blog posts to help you maximize the effectiveness of your email subscription and lead generation forms. Design forms to increase user engagement, and put our tips to capture leads into action. Track the performance of your form as you make changes, so you can see exactly what works for your unique setup.

When your list starts to grow, begin your email marketing campaign. Design something awesome to show your subscribers the very best you have to offer. Include value added content, helpful hints and the occasional special offer. Be sure to mention that it's exclusive to email subscribers.

Read more about using MailChimp for WordPress forms

The post How to make a MailChimp contact form for WordPress appeared first on Formidable Forms.

How to make flexible WordPress classified ads with your forms

$
0
0

Create a beautiful, filterable, and searchable directory that allows users to manage and even pay for their WordPress classified ads. Sell anything from cars to real estate.


WordPress classified ads

Your project may not be the next Craigslist. But even smaller, more specialized WordPress classified ads sites require some extra features that you don't often see. So how do you make it work? Do you go with an expensive specialized theme or plugin made just for classified ads? Or is there a more flexible option?

If you're already familiar with Formidable Forms, you know just how powerful it can be as a web application building tool. Leverage this power to create a classified ads site that integrates seamlessly with WordPress. Display a beautiful, filterable and searchable directory that allows users to manage their listings and even take payments.

What does it take to put together a custom WordPress classified ads site?

This is too big a subject to offer an in-depth tutorial in a single blog post. So I'll cover the process overview, and provide links to more detailed documentation on the individual steps.

To follow this tutorial, you'll need a license for Formidable Pro for data management (some features aren't available in the free version), the User registration add-on, the MailChimp forms add-on, and the Paypal standard add-on to process payments.

The Stripe payments add-on is also worth installing. That way you can give your customers a choice of payment methods, although you do need an SSL cert to use Stripe on your website.

The main elements of our classifieds system are:

  1. An admin form to add categories and sub-categories
  2. A form to add new listings and take payments
  3. A view to display the listings
  4. A search form to filter and search the listings
  5. A way to let users edit their listings from the front-end

Step 1 - Build a category form for your WordPress classified ads

wordpress classified ads category form If you're building a classified ads website, chances are that you'll have a good number of categories and sub-categories. This structure helps a user navigate easily and filter results quickly to find what they need. You'll probably need to add extra categories in the future too, as your community gets busier and you see the need to expand in some areas.

Build a form to add your categories to make this process simple. Use lookup fields on the "New Listing" form so it will always stay in sync. Then when you add a new category, it will be immediately available for users to choose from.

This category form will include two simple single line text boxes. It will be published on a page that is only visible to Admin. Initially, for the sake of speed, I will bulk import a CSV file containing my main category and sub-category definitions. But having the form on a page will make it easy to add new categories if required.

Alternatively, if you're using a WordPress custom post type for your classified ads, you can create your categories in a custom taxonomy. Then dynamic fields will use your custom hierarchal categories to fill the dropdowns. If you go this route, you can skip this category form and manage the categories in WordPress.

Step 2 - Build a login form

add WordPress classified ads users to an email list To allow users to edit their own listings, we need them to be logged in. So I'll add a
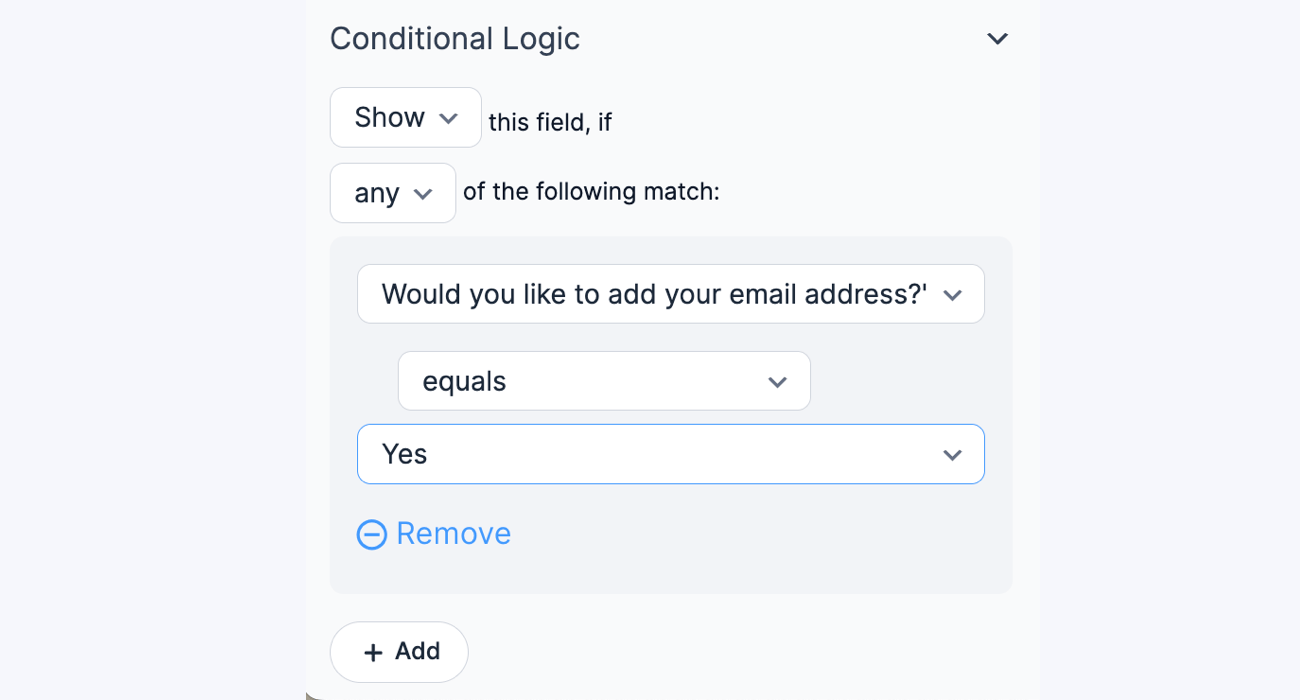
 page with a login form and a registration form. This is simple using the User registration add-on. Just add the shortcodes to the page and the job is done.

** Bonus ** Include a MailChimp action in your new user registration form. This adds all new users to your MailChimp mailing list to help drive your email marketing success!

Step 3 - Build the "New Listing" form for your classified ads

Your new listing form is perhaps the most important part of the process. But this is also the part that will need to be customized the most to fit your exact needs. Take some time to think about what your users really need to see on each listing and tailor your form to meet your unique requirements.

Most classified forms will contain fields for the advertiser's postal address, contact number and email address. Plus a field for the price, an item description field, and a photo upload field that can take up to 10 images. It would usually have lookup fields that pull data from your categories form or dynamic fields to get your WordPress categories, and a hidden date field to control the listing expiration date.

Your New Listing form will probably need some conditional field logic too. For example, if your classified ads website has a section for used cars, listings in this section will need additional information such as Mileage, Fuel Type, Transmission, etc. Use conditional logic to show these additional fields only when the used cars category is selected.

Your New Listing form is also the place to take payments. Read more about using the PayPal add-on and the Stripe add-on .

Step 4 - The classified ads search form

A classified ads website without a search form is about as useful as a chocolate toothbrush. So this is something you need to get right.

Your listings will be displayed in a View. A custom search form is needed to search those listings. Exactly how you setup your form depends a lot on the type of classified ads site you are running. Read more detailed instructions for building your search form.

wordpress classified ads search form ** Pro Tip ** I personally found my classified ads search form gave the most relevant results if only one text/keyword field was used. Dropdown fields can be used to filter by category, sub-category, and even town and state. Then a single (optional) keyword field finishes the search form.

Step 5 - Classified ads edit form

It's essential to let users edit their classified listings. A user may want to reduce the price for a quicker sale, upload better photos, add more details about the item, or mark it as sold.

To enable ad editing, use front-end editing via a View. The View should be filtered by "User ID is equal to current_user" so each user can only see and edit their own ads.

Bonus step - Extending the classified ads system

Your WordPress classified ads system works great. But can you make it even better? We don't have space to cover it in this tutorial, but adding a user profile form, a star rating or trust-scoring system for each user, or even making user feedback visible on each profile page could give first-time visitors the confidence they need to contact an advertiser or make a purchase.

You can also use 3rd-party plugins to take the Address Fields and display pinpoints on a map so users can see at a glance which listings are closest to them.

We love to see examples of the classified ads site you create with Formidable Forms. Take a look at It's my Town, a great WordPress classified ads site built by a Formidable community member. If you're particularly proud of your website, submit it to the showcase gallery on our Community Website.

The post How to make flexible WordPress classified ads with your forms appeared first on Formidable Forms.

How to Create a Multi-part form in WordPress

$
0
0

Long forms? Use page breaks to quickly split a WordPress form into a user-friendly, multi-part form! Plus, add conditional branching with smart logic for even better results.

How to Create a Multi-part form in WordPress

It's a fact that long forms kill conversion rates. The longer your form, the fewer users will reach the end. Even if your form is for employees and isn't optional, it can still be a painful process and workplace distractions may prevent completion.

A multi-part form takes out the pain by splitting the form into smaller, easy-to-manage sections. If your users are logged in, a draft is saved on every page turn so they can return and complete the entry later.

If you're not already using multi-part forms, here's a quick guide on how to use them and what they can do for you.

When should I use a multi-part form?

Multi-part forms are an amazing tool to simplify long, complex forms and massively improve the user experience. Most long forms can be divided into natural sections. For example, a travel booking form could be divided into pages for Contact Details, Traveler Information, Additional Requirements, and Payment Details. rootlines and progress bars show progress through WordPress forms

Rootlines and progress bars allow users to see how far through the form they are and how many steps remain. Give a little light at the end of the tunnel if your form is extremely long!

How do I split up an existing WordPress form?

It couldn't be simpler. Just go to the form builder page to edit your existing form. Once there, drag and drop the Page Break field elements into the positions where a new page should start. Formidable will do the rest.

Wordpress form builder progress bar and rootline settingsNext, enable a rootline or progress bar. To do this, navigate to the settings page for your form. About half-way down you'll see the "Pagination" heading. Select the option that best suits your form here.

Can I simplify a long multi-part form even further?

Yes! Multi-part forms can use conditional branching to skip pages with smart logic based on user input. Conditional page breaks allow you to skip over pages that don't apply to your user. You can setup your form so a single page or multiple pages are skipped conditionally.conditional branching to skip pages with smart logic in a multi-part form

For example, if you have a travel booking form and the user selects a room-only package, set your form to skip pages related to meal choices or dietary requirements. Depending on your form, this could drastically reduce the time it takes a user to complete it.

Do you have long, complex forms?

If you're not already taking advantage of multi-part forms, now is the time to make the change! It will take only a few minutes to update your existing forms, but the benefits will last a lifetime.

If you track your form conversion rates, we'd love to hear how switching to a multi-page form benefited you. Let us know in the comments how much your conversion rate improved.

The post How to Create a Multi-part form in WordPress appeared first on Formidable Forms.

Save time with a WordPress FAQ plugin

$
0
0

Now that you have a contact form, are you getting a lot of emails? Are you answering the same questions over and over? Save time with a WordPress FAQ page.

Make Formidable your WordPress FAQ plugin

How can a WordPress FAQ plugin help me?

Time is your most valuable asset. But there never seems to be enough to do everything on your list. And no matter what you do, you can't make more of it.

But maybe you can shorten your list. Maybe you can shift to the most important items on your list, by reducing the time spent on the day-to-day tasks.

You have a contact form on your site, right? And now that it's there, visitors are contacting you before they decide if they will bring money to the table. Are you seeing the same questions over and over? Save time by answering those questions before they are asked.

What features should I look for in a WordPress FAQ plugin?

Already have an frequently asked questions page? Many webmasters check their traffic stats and see that their FAQ page is visited a LOT. And those visitors are usually potential customers, ready to purchase. Sadly, this very important, high-traffic page often gets minimal attention and is rarely, if ever, updated.

Make it easy to add new questions and answers to your FAQ page! Also, give your team a way to keep your FAQ page updated so it's not all up to you. The right system will help you give visitors the up-to-date information they need. But do you need a dedicated WordPress FAQ plugin for this? No - Formidable can do it all!

It's easy and super flexible to add and display FAQs with Formidable. The basics can be setup in about 15 minutes, though you may want to spend a little extra time styling your View to suit the style and color scheme of your website.

Step 1 - Create an FAQ form to compile your questions and answers

Your "Add a new FAQ" form is very simple with a single line text field for the "Question" and a paragraph field for the "Answer". On this form I would recommend removing the default email notification and set the form to show with the success message. That way you can easily add multiple FAQs in a row if needed.

Step 2 - Add your FAQ form to a secure page

It's important that authorized team members have access to this form and the general public does not. I would recommend setting different user roles for your team and your customers. Then you can limit the form visibility so only your team can see the form. You may also wish to publish the form on a password protected page.

Step 3 - Create a View to display on your FAQ page

WordPress FAQ page plugin
Once your form is complete and you've entered your current FAQs, it's time to create a view to display them. Your View can be as simple as the field ID for your question, and the field ID of the answer. A simple "All Entries" View is perfect for displaying FAQs.

Your FAQ view content might look like this:

<div id="[key]">
<h3>Q. [50]</h3>
[51]
</div>

In most cases, wrapping your View content in a <div> with a unique class or id is a good idea. This will allow you to apply styling via CSS. It's important that adding functionality does not impact the aesthetic of this important page, so spend a little time styling your View.

Step 4 - Display your View on your FAQ page

Publishing your View on the page is as simple as placing the shortcode on your page. Make any final tweaks to your CSS and styling so your FAQs look professional and easy to read.

And that's it. Your FAQ system is done! Four simple steps and you have an FAQ page that allows all your team members to easily add new FAQs, without directly editing the page content or even accessing the admin dashboard.

Bonus step - Easy frontend editing

FAQs can change, so the ability to easily edit them is a feature every good WordPress FAQ plugin should have. With Formidable, just insert an [editlink] shortcode into your View and it will be visible only to users with permission to edit the entry. So your visitors won't see it. The edit link next to each entry allows you to edit or update each FAQ in a matter of moments. Learn more about front-end editing or how to set it up.

Double bonus step - Search FAQs with pagination

Do you have so many FAQs that it's difficult to find the answer you are looking for? Want searchable FAQs? No problem. Just add

on your FAQ page, and they'll be instantly searchable.

Have too many questions to show on a single page? Go to your View settings, choose a page size, and you're good to go.

Create an FAQ page today

Don't spend another minute responding to the same question yet again. Create an FAQ page instead, and offer a link to it in your email response. With each question you receive, ask yourself if it's been asked before, and if you can prevent it from being asked again.

Get started with your FAQ page today, using the best WordPress form builder plugin that doubles as an FAQ plugin. Little by little, you will find you have more time to spend on the things that matter.

The post Save time with a WordPress FAQ plugin appeared first on Formidable Forms.

How Chrome is leading the switch to HTTPS for WordPress forms

$
0
0

Have you heard about the coming Chrome changes to your WordPress forms? Don't delay. Learn how to switch to HTTPS today.


How Chrome is leading the switch to HTTPS for WordPress forms

Last week, Google sent out email notices to webmasters everywhere:

Starting October 2017, Chrome (version 62) will show a “NOT SECURE” warning when users enter text in a form on an HTTP page, and for all HTTP pages in Incognito mode.

switch to https for the green SSL padlock You don't often see bold, bright red text in my blog posts, so take note, this really is a big deal. It will affect your website.

The official email from Google Search Console/Chrome included a list of pages on your site that will trigger the new Chrome warning. This included pages with text input fields, which is nearly every page with a form on it. The email concludes with: The new warning is part of a long term plan to mark all pages served over HTTP as “not secure”.

Why should I switch to HTTPS?

How would you react if you saw a webpage marked as "Not Secure" that was asking you to input your personal information? I know I'd think twice about completing the form, even if it was only a simple contact form.

It's easy to agree, this move by Google could have a major impact on form conversion rates. Since other browsers are sure to follow suit, this is an issue that shouldn't be ignored. But how hard is it to fix this?

To prevent the “Not Secure” notification from appearing when Chrome users visit your site, the way forward is to switch to HTTPS. Making the switch may be much easier than you'd expect.

Read more: What is the difference between HTTP and HTTPS?

An SSL certificate is required to switch to HTTPS. These certificates used to be mainly for online stores, or official government or corporate websites. Until recently, SSL certificates had a cost attached. While not prohibitive (usually starting at about $80 - $100 a year), it was simply unnecessary for most small websites.

The recent availability of cheap or even free options has meant SSL uptake has skyrocketed. If you're lucky enough that your hosting provider offers LetsEncrypt SSL certificates, you may be able to do this completely free. However, some providers still charge a one-time setup fee.

How to switch to HTTPS

How to switch to HTTPS with Lets encrypt For this example I'm going to switch my dad's website to HTTPS. He has a cleaning business with a simple website. Don't judge - I built it years ago. Since he's just about to retire, it's not getting a revamp!

Step 1 - Update everything

Update your plugins, WordPress and your themes. This has absolutely nothing to do with SSL. It's just good practice. Do it every time you login to your site. I even updated the PHP version the site runs on to give a bit more speed.

Step 2 - Get a SSL certificate

Login to your hosting control panel and look for the SSL certificates section. Luckily for my dad, his hosting provider offers free LetsEncrypt certificates. I'll click that button, click the "Check my domains" button to make sure there's nothing funky with my the DNS setup. When the check comes back OK, click the "Request SSL" button.

Within 60 seconds I now have an SSL certificate! But simply having the certificate is not enough.

Step 3 - Redirect HTTP to HTTPS

Next I need to setup a redirect to force all traffic to use HTTPS. I'm going to use .htaccess redirect to HTTPS with a few added lines. If you use Yoast SEO, under the Tools menu there is a handy file editor feature that allows you to make this change from inside WordPress.

I'm going to add this code to the very beginning of the htaccess file and click save.

RewriteEngine On
RewriteCond %{SERVER_PORT} 80
RewriteRule ^(.*)$ https://johnjonescleaning.com/$1 [R,L]

Important: Change the URL to match your website. If you have existing code in your .htaccess, add this above the rules with a similar starting prefix. Be careful not to add it between the # BEGIN WordPress and # END WordPress lines. If you do, your changes can get overwritten at any point.

Step 4 - How to tell if a website is secure

Check for mixed content errors. HTTPS redirect doesn't instantly make your site secure.

Although your page is now loaded over HTTPS, there may be elements that are still requested via insecure connections. Because of this you may see HTTPS in the URL bar of your browser, but the reassuring padlock icon that usually goes with it is missing.

How to tell if a website is secure after redirect http to https To fix this, right click on your webpage and click on "Inspect". Click the Console tab in the panel that opens up. This will show details of mixed content.

Most of these errors can be automatically fixed in one quick action by installing a plugin like SSL Insecure Content Fixer or HTTP / HTTPS Remover. I use the 2nd option myself. These plugins simply remove the HTTP or HTTPS references from your pages, so the redirect you setup in step 3 can be applied to all links.

If you still see mixed content errors after using one of these plugins, you should be able to track down the link and update it manually. You can even run a search and replace function if the link is hidden in a theme file somewhere. WhyNoPadlock.com may also help you root out the problem.

Check EVERY page of your website. You may be loading external resources like ratings widgets or award badges on some pages. These may need to be manually switched to HTTPS.

The result of the switch to HTTPS

switch to https complete with secure green padlock Once you've fixed all the mixed content errors on each page, you will get the reward for your switch to HTTPS. That coveted green padlock icon is finally in your address bar with the reassuring word "Secure" next to it!

At this moment in time, switching to HTTPS has already had a positive influence on the Google ranking of my dad's site. For that reason alone it was already worth doing. Plus, the upcoming changes will soon have a HUGE negative impact on pages with WordPress forms. A big red "Not Secure" notice on your pages will impact user experience and form conversion rates if you don't make the switch to HTTPS. So don't wait. Make the switch to HTTPS today!

The post How Chrome is leading the switch to HTTPS for WordPress forms appeared first on Formidable Forms.

How to create WordPress forms with a custom form layout

$
0
0

Custom form layout has a huge impact on conversion rates. Create a natural path through the form fields for users to follow.


How to create a custom form layout in WordPress forms

As someone who specializes in front-end web design, wasted screen space is one of my biggest pet peeves. This is never more apparent than in badly designed forms.

Unfortunately, there is no magic formula for the perfect form layout. Forms are too diverse for one simple solution. However, you may want to research designs that improve conversion rates and apply those same principles.

In this tutorial I'll cover the basics of building layouts and designs. This will give you the skills to build a custom form layout that is a perfect fit for your unique needs.

The basic form layout with rows and columns

Formidable includes built-in CSS classes as part of the WordPress form builder. They allow you to build row and column layouts simply and quickly.

Open the settings for any of your form fields to see the CSS layout classes box. Click on this box and the layout classes appear in the left panel. Then simply click on a class to insert it.

css layout classes for form design

If your field is the first in the row, click the "First" button. Then click the field width button you'd like, such as 1/2 or 1/4. This may result in your first field having the class frm_first frm_half, and your second field having the class frm_half. This would give you a row split into two columns. For the following rows, again include the frm_first CSS class for the first field in each row.

custom form layout CSS These CSS layout classes are mobile friendly and responsive so they will adjust depending on screen size. On small screens the form layout will automatically rearrange to a single column of 100% width fields to maintain usability. This is automatic and does not require any setup.

For a full list of available CSS layout classes and their functions, see our form layout knowledgebase article. If you use the Bootstrap add-on, you can use Bootstrap form layout classes too for even more custom form layout options.

Advanced custom form layout with sections

Basic layouts have one small limitation. When you split a row into columns, you can only have one form field in each column.

Paragraph text fields and upload fields are a lot taller than radio button fields. Arranging these fields side-by-side can look messy. Section fields are the answer!

When using sections for form layouts, apply the CSS layout classes to the sections, NOT the individual fields. Also, when using sections, set the Label Position to "None" unless you would like a heading displayed.

Even though the paragraph text field is the only item in my first column, I still placed it inside a section. This is because section padding would make the two columns look uneven if only half the row was inside a section.

Sections used for custom form layout

As you can see, the Radio Button, Single Line Text and Website/URL fields (that are contained in a section) stack in the same column below each other. This allows them to match the height of the Paragraph Text field. It's a simple way to avoid messy white-space in your form.

Combine the CSS layout classes with sections to build almost unlimited form layouts. Forms can be designed to perfectly fit the available space, neatly and without wasted space.

So what are you waiting for? Use the power of Formidable to build your perfect WordPress form today!

The post How to create WordPress forms with a custom form layout appeared first on Formidable Forms.

How to let users submit photos on your WordPress site

$
0
0

Contact forms with a front-end uploader have been around for years. But you can now do far more with the user-submitted photos.


How to let users submit photos on your WordPress site

Back when the internet was young (and I was too), contact forms were invented. Soon after, amazing new upload fields were built. We marveled at the possibilities ahead. At that time, uploaded files were simply attached to the email notification. For the time-being, this was enough.

Then sadly, innovation seemed to grind to a halt. It felt like very little happened with the development of upload fields for a long time.

The issue: How to transfer images from emails to WordPress

front-end uploader for user photos icon Receiving uploaded files by email made it very hard to automate any use of the images. Sure it was nice that my clients could send me photos. But to use the photo on my website, I either had to manually upload it and insert it into my HTML page, or write a complex script to automate it. The level of work and time involved meant that taking advantage of user-submitted photos and content was often not worth the hassle.

I used some pre-made scripts, and even bulletin board/forum scripts on occasion. These were usually very complex, quite limited and rarely updated. They did what I needed (just about) but it wasn't a solution I loved.

The dream: Allow users to submit photos in WordPress for automatic display

The dream was a system where uploaded files could be used automatically, and without any admin effort (apart from moderation). Where online photo competitions could be setup and run with almost zero effort. Where user-submitted content could power a website without sucking every minute of the webmaster's life. A system flexible enough to be used on almost any type of website, and updated to keep in touch with the latest features and trends.

The dream becomes a reality

The first glimpse of this becoming a reality came with WordPress. I'll admit, when I first looked at WordPress circa 2007 I thought it was about as useful as a chocolate toothbrush and instantly dismissed it. I was used to building sites with HTML/CSS and didn't see any advantage in switching.

user-submitted photos to create WordPress posts But as I kept hearing about new features and improvements, I revisited it a few years later and was pleasantly surprised. I dabbled in WordPress and built a few small, simple websites, but still didn't fully commit.

The issue of user-submitted content encouraged me to take the plunge once and for all.

I'd been awarded a project that revolved 100% around using a front-end uploader for images and content. This content needed to be uploaded, held for moderation, and published to the website with a simple click. When I discovered Formidable, I knew that WordPress was the solution.

What can you do with user-submitted photos?

Formidable has many different ways to automatically integrate user-submitted photos and content. Here are my top 5:

  1. Images can of course still be included with emails like other form builder plugins. Formidable makes it easy to setup multiple notifications to dynamic recipients, and even use conditional logic to define the message content.
  2. Create posts directly from forms where users submit photos with the front-end uploader. Use the uploaded images within the post content or as the featured image.
  3. In addition to posts, create custom post types and pages from form submissions and insert the uploaded images.
  4. Display your front-end submissions in customizable grids or lists with Views. This is perfect for building photo competition galleries. Each item in the main View can link to a detail page with more info about that specific entry.
  5. Integrate with 3rd party services. Use the Zapier add-on to send your uploaded images to dropbox, Google Sheets, and Google Calendar. Send photos to Twitter as tweets, and much, much more. Use the submitted photos in hundreds of applications.

The best part of using WordPress forms to submit images?

automated user-submitted photos from WordPress forms It's all automated! Gone are the days of manually adding user-submitted content. Formidable does it all for you.

These features opened up a new world of possibilities for me. User-generated content can be used to power an entire website. Guest blog posts are easy to implement. Users can submit businesses to a directory, or pin their travels on a map. All using Formidable!

Now it's easier than ever to build forms, collect submissions, and automatically publish them to your website.

I've even used Formidable Forms for clients who want to maintain a blog and update their website, but don't feel comfortable with the WordPress dashboard. Custom forms and Views allow them to create and edit posts and pages in a simplified way, without ever needing the dashboard.

Do your users submit photos and content on your WordPress site?

How do you currently manage the photos your users submit? Do you spend a lot of time transferring photos from one place to another? Don't spend another minute on tasks that can be automated. Start today with a data management plugin that can do it for you.

The post How to let users submit photos on your WordPress site appeared first on Formidable Forms.


How to verify email addresses in WordPress

$
0
0

Do you want users to verify email addresses before submitting a WordPress form? Do you want email verification without user registration?

How to verify email addresses without WordPress registration

Email verification during user registration

It is essential to ensure form submissions come from legitimate users. In most cases this is easy.

Email verification can be triggered automatically when a new user is registered on your WordPress site. If you create user accounts with your WordPress forms, you can block other forms from logged-out users. Quick and simple.

Verify email address without registration

Did you know that you can check if email is valid without registering users? In this short tutorial I'll guide you through the process of setting up a WordPress form that can only be completed after an email address has been verified.

Step one - Create the email verification form

First, create a form to request the user's email address. This form can be short and sweet, without extra details. My form asks for an email address with a confirmation field. That's it.

This initial form displays a success message to instruct the user to check their inbox and confirm the email address.
email verification form in WordPress

Read more: WordPress not sending emails? SMTP to the rescue!

Step two - Use a View to hide Form B unless email is verified

Form B should only be visible to users who have verified their email address via Form A. To achieve this, place the shortcode for form B inside a View. Use filtering to hide it from non-verified users.

  1. Set the View to show a "Single Entry" from Form A.
  2. I'll keep it simple, with only the shortcode for Form B in the Content box.
  3. Add two filters so the View Content (Form B) will only be visible if both the Entry Key and Email Address match an entry in Form A. Add default=1 to the filters so if the url is tampered with, that filter will not be ignored.filter view to protect form

If the page is loaded directly without clicking on the link in the email, these filters will return "No Entries" and hide the form. The security of this system is greatly increased by combining the random (and not publicly visible) entry key with the email address.

Modify the default "No Entries" message to include the shortcode for Form A or a link to it. This tells visitors who may arrive at the page directly, that they must confirm their email address before proceeding.

email verification form message

Step three - Add a verification link in the email message

When an email address is submitted in Form A, the verification email is triggered. The email message needs to contain a link to the View created in step 2.

I'm going to create this link using the guide to create a custom search. Pass both the entry key and email address to match the filters included in the View. You can use any form values you'd like as long as you add matching filters in the View.

email verification link settings

When the link in the verification email is clicked, the View matches the data in the URL to an entry in Form A. When it finds a match, the form is visible!

form visible after email verification

So that's it! Three simple steps to create a form that can only be completed after email verification.

Have you used similar methods to verify users who aren't logged in?

The post How to verify email addresses in WordPress appeared first on Formidable Forms.

How to Create a Charitable Donation Form in WordPress

$
0
0

Every cent counts when you run a non-profit. Learn how to build an online charitable donation form with zero fees.


How to Create a charitable Donation Form in WordPress

Have you looked into donation forms in the past and found the options to be quite limited? The processing fees may seem small to a business, but that 3-5% you lose in fees could do a lot for your organization.

This is where most non-profits hit a roadblock. So few payment processors offer a donation service without fees. The ones that do have very limited integrations.

Many non-profit websites rely on Paypal donate buttons. Paypal donate buttons aren't new, but they are very basic and very limited. Could your organization benefit from including Paypal donation options in your online forms?

I'll use the Paypal add-on and the MailChimp add-on in this tutorial. But before you decide on the payment platform, read a case study about converting from PayPal to Stripe as a non-profit.

Where should you put your charitable donation form?

In past posts I've mentioned how powerful it can be to include an additional action in an existing form. If your newsletter signup is included in your contact form, conversions are usually much higher than a standalone signup form. The same is true with donations!

WordPress charitable donation form icon

It can be much more effective to include an "I would like to make a donation" checkbox in your contact form rather than a donation button all on its own.

It may seem a little cynical talking about "maximizing conversions" in relation to a charitable organization. But remember, you're doing good work. You could do more good work if you had more funding. So you should never be shy about making the most of your donations potential.

** NOTE ** Paypal no longer allows recurring donations, which I personally find very disappointing. In a future blog post I'll discuss options for subscription payments and which has the lowest fees. For now I'll concentrate on getting the most from one-time donations.

One-time donations VS ongoing subscriptions

Regular subscriptions every month can be invaluable. But it's much easier to get conversions from a one-time donation form, when compared to signup for ongoing payments.

add donation option to wordpress contact form

Because of this, many organizations display the one-time donation form on their website. When a donation is made, the visitor is subscribed to a mailing list. Then options to support the organization with a monthly subscription is highlighted in regular newsletters. MailChimp is perfect for this purpose.

Highlight the ongoing achievements and successes of your organization in a regular newsletter to make return donations and subscriptions more forthcoming.

Turn an existing WordPress form into a charitable donation form

charitable donation form action Step 1 - Add a checkbox to your form with a label like "I would like to make a one-time donation."

Step 2 - Create a dropdown labeled "Donation amount". Include options for popular donation amounts.

Step 3 - Use smart forms with conditional logic to hide your donation amount dropdown, until after the checkbox is ticked.

Step 4 - Setup a PayPal form action. Make sure the payment type is set to "Donation". Select your donation amount dropdown field in the "Amount" setting. Don't forget to set the success and cancellation URLs. Use these pages to say thank you or give a visitor the opportunity to give feedback on why they canceled.

Step 5 - Setup a MailChimp form action. This should add the user to your mailing list for supporters. I recommend the double opt-in method with conditional logic, so it only runs when a donation is made.

Step 6 - Setup a "Thank You" email. This step is SUPER IMPORTANT!!! Are you truly grateful for the support? Let generous donors know how much it means to you. They may tell their friends, and they will be more likely to donate again in the future. Express your genuine gratitude, and let them know just how much it means! Set this email up in MailChimp or as an autoresponder in your email form settings.

An easy charitable donation form for non-profits

So that's it. Add a donation option to existing WordPress forms in six simple steps!

Formidable can also be used to build standalone donation forms and recurring payment authorization forms. We'll look at these options in more detail in future tutorials.

The post How to Create a Charitable Donation Form in WordPress appeared first on Formidable Forms.

How to build a WordPress event calendar from user submissions

$
0
0

Looking for a WordPress event calendar that allows you to display events, and easily add user submissions? We have the solution for you!


Plugin to show WordPress event calendar user submissions

Do you need a WordPress event calendar for user submissions?

Building an example WordPress event calendar is fairly simple, but it's still a lot to cover in a blog post. If you would like more in-depth instructions, the knowledge base article is recommended reading.

Step 1 - Build a WordPress form for new user-submitted events

This form needs some basic minimum information. It must include the Event Name and Event Date. You also have the option to create multi-day events, and events that repeat. If your events will utilize these features, add fields to your form for these options too.

Next, add a more detailed description of your event. You may want to include an event itinerary, dress code, venue details or even a seating plan. Add fields to your form for any details you wish to display.

For my example I'm going to setup a calendar for a school website, so my form looks like this:

WordPress event calendar plugin for school events

At this stage you should define the settings to limit your form visibility and submission permissions. Would you like the form to be used by administrators only, or for user-submitted events too? Configure these settings to best suit your unique requirements.

Step 2 - Build the WordPress event calendar view

WordPress event calendar user submissions in a View Formidable comes with an option to display form data in a calendar View, so this bit is really easy. Setting up an event calendar view is almost exactly the same as a normal View. The only difference is you choose the Calendar View type.

Select the fields that set the event start date and event duration and repeating options if required.

WordPress event calendar user submissions settings The calendar overview doesn't have space for lots of text, so keep the main content simple. I'll display just the event name in the overview with a link to find out more about each event.

<h3><a href="[detaillink]">[2752]</a></h3>

Swap out 2752 for the ID of the field that contains your event name.

At this point make a few test entries in your form. Then copy your View shortcode and publish it on a page to get an idea of how it's going to look.

Step 3 - Build the detailed page for the WordPress event calendar user submissions

The detail page allows you to display all the extra information associated with the event. I've added a little formatting to my code, but it really is just a list of all the fields for that entry. My code for the detail page is:

<table style="width: 100%;" cellpadding="20">
 <tbody>
 <tr>
 <td><strong>Event:</strong> [2752]</td>
 <td><strong>Date:</strong> [2753]</td>
 <td><strong>Duration:</strong> [2754] Day(s)</td>
 </tr>
 </tbody>
 </table>

<hr>
 <strong>Details:</strong> [2755]
 <hr>

<table style="width: 100%;" cellpadding="20">
 <tbody>
 <tr>
 <td><strong>Ticket Price:</strong> [2756]</td>
 <td><strong>Organizer Contact:</strong> [2757]</td>
 <td><strong>Booking URL:</strong> [2758]</td>
 </tr>
 </tbody>
 </table>

<hr>
 <img src="[2759]" alt="" class="aligncenter" size-large />

The resulting detail page looks like this:

WordPress event calendar user submissions detail View

Step 4 - Allow easy front-end event editing

Even the best laid plans can come unstuck. It might be due to inclement weather or issues with the venue. So easily editing your events is essential.

To enable editing for your event calendar, first go to your form settings page. Scroll down to 'Permissions' and check the Allow front-end editing of entries box. Determine which user role can edit their own submissions and which user role can edit responses submitted by others. Usually this is set so logged in users can edit their own entries, and only administrators can edit other user submissions.

Add an edit link to the View. This can be added in either the Listing Page, or the Detail Page box (or both). The edit link is only visible to logged-in users who have permission to edit that entry. So it will be invisible to the majority of your visitors.

[editlink label="Edit" page_id=y]

Replace 'y' with the Page ID where your form is published. Follow these instructions to find the page ID. Then click Update to save your View. Now an "Edit" link will appear next to each entry for quick and easy event changes.

Enjoy your WordPress event calendar

That's it! Four quick steps and you have the perfect WordPress event calendar for user submissions!

Have you used a calendar View to build something you're proud of? Submit it to our community showcase. We'd love to see your creation!

Not using Formidable yet? Get started today with the most powerful form creator and data management plugin.

The post How to build a WordPress event calendar from user submissions appeared first on Formidable Forms.

How to send confirmation emails with your WordPress contact forms

$
0
0

Do your visitors need to know you received their message? Learn how to send confirmation emails with an autoresponse to the form submitter.


How to send confirmation emails with your WordPress contact forms

WordPress contact forms do more than ever before: create posts, perform calculations, add a subscriber to a list. All this and more is possible with a Formidable contact form. But even with these amazing features, the ability to send confirmation emails to the person who submitted the form is still one of the primary functions of most contact forms.

How do you send confirmation emails from a WordPress contact form?

This step by step tutorial guides you through the process. It explains important settings that if configured wrong, could prevent your emails from being delivered. Make sure this doesn't happen to you!

Step 1 - Build your WordPress form

Build your Formidable form like you normally would. Include an email address field and confirmation field if you'd like.

Your form can be multi-page and full of conditional logic. It can have lots of other form actions like payment collection or addition to a mailing list. Custom confirmation emails can be included no matter the size of your form!

create a form to send confirmation emails

Step 2 - Setup the email notification

On your form settings page, click on the Form Actions tab. Here you can build the message to suit your unique needs.
settings to send confirmation emails from WordPress contact forms

  1. Set your TO address to go to your visitor. Click into the TO box, then click on your email field in the sidebar. This will insert a shortcode like [25] to reference your email field. "25" will be replaced with the ID of your email address field.
  2. Add your CC or BCC addresses and a REPLY-TO address if you wish.
  3. Don't forget to add a custom subject line.
  4. Add your message. Email actions come pre-configured with the [default-message] shortcode. This will insert all of the form fields into the email message. Configure it with the shortcode parameters and add a message to your client before it.

Customize your autoresponder message

To completely customize your confirmation email, remove the [default-message] shortcode. Now add your custom message. If you don't want to include any HTML in your message, check the box to "Send emails in plain text." Read more information about custom email messages in our knowledge base.

In the "Customization" panel to the right you will see a list of all the fields in your form. Simply click on a field to insert it into your email message.

Add all the HTML you would like for confirmation emails that are crafted to match your branding and beautifully customized!

Step 3 - Protect your confirmation emails from spam filters

Do you get drastically less spam emails today than you did a few years ago? I know I do!

Avoid spam filters with your WordPress confirmation emails

A worldwide crackdown on spam and much stricter spam detection has lightened up your inbox. Spam detection rules are often introduced by the biggest providers, like Gmail and Hotmail. These standards are then quickly adopted by the rest of the internet.

The default PHP method used by WordPress to send emails often leads to falsely detected spam. These false positives are then deleted before delivery. To prevent this, setup your email in a way that shows spam filters that it's a legitimate message.

Six simple steps to make sure your Formidable emails are properly configured

  1. Your FROM address MUST match the domain of your website. It is often best to setup a dedicated email for this, like noreply@mydomain.com.
  2. Your TO address should never match your FROM address. This looks unusual and can trigger spam deletion.
  3. If you specify a REPLY-TO address, it should never match your TO address.
  4. While you can include multiple addresses in your TO field, it is best to use the CC and BCC fields for additional recipients.
  5. Many spam filters are triggered by too many recipients in one email. For large lists (50 or more recipients), consider a service like Sendgrid or SendInBlue.
  6. Minimize the links you include. Email messages with lots of links may trigger spam filters.

Step 4 - Use an SMTP plugin to send confirmation emails

Even with all this configured properly, some users on shared hosting still have issues. There is another step you can take. When you send your email messages via SMTP it adds an extra layer of authenticity. This helps messages pass spam filters.

Plugins like WP Mail SMTP (and many other similar ones) replace the default WordPress mail function. Instead, these plugins connect with the SMTP server in your email server and send emails via an official mailserver.

Read more: WordPress not sending emails? SMTP to the rescue!

Sendgrid logo for sending confirmation emailsMany of these plugins will also connect with transactional email services like SendGrid, MailJet, SendInBlue etc which further improve delivery rates.

Build your confirmation emails today and discover the power of Formidable forms!

The post How to send confirmation emails with your WordPress contact forms appeared first on Formidable Forms.

How to easily allow visitors to pay-per-post in WordPress

$
0
0

Are you building a directory or classified ads website? Do your users pay to submit posts? Did you know Formidable is an easy pay-per-post solution?

How to easily allow visitors to pay-per-post in WordPress

Pay-per-post solutions for WordPress have been around for years. They are essential when building an online directory or classified ads website. Users pay a small fee for each ad they place, or each listing they submit.

How to let visitors pay to submit a post

There are so many scenarios that use pay-per-post, making it be impossible to write a tutorial covering them all. Instead, I want to offer an overview of the options, with links to knowledge base articles where you can learn more. Make it happen in five simple steps.

Step 1 - Build a WordPress pay-per-post form

Add the fields you need to create a new post, including a title and the main text content. A contact number, address and a featured image upload are a great base. For a classifieds website you might want to add fields for the item category, item condition and item price.

For an online directory our Locations add-on will help to format your address fields in a consistent way for a mapping plugin to display each listing as a pin in a map.

Add a Post Status field to your form which defaults to "draft". Mark this field as read-only and set the visibility to "Administrator".

It is often sensible to require users to register before submitting a new listing. Add a User ID field to your form to create a link between form submissions and the logged-in user that created them. This allows users to edit and update their own listings from the frontend.

Step 2 - Setup your form to create a WordPress post

pay-per-post create new post setting
The action to create a new post can be as simple or as complex as you'd like. A single field for your post content gives a quick and simple layout. Or create a View to display your content with a more customized layout and style. This option allows you to create almost any kind of look you can imagine, so it is often worth the extra effort.

Step 3 - Require payment before the post is published

The Post Status field you setup in step 1 means that your form will save new posts as drafts. These drafts will be published once payment is completed.

To enable pay-per-post functionality, add a payment action to your form using either PayPal or Stripe. These two gateways offer instant transactions and automatic confirmation. Payment confirmation triggers post publishing.

Set the "After Payment" action to change your Post Status field to "Published" on payment completion.

publish post automatically after payment

Step 4 - Display your paid posts

This step depends a lot on your theme. Most themes have built-in templates to display posts in an attractive way with minimal customization.

Display your listings with the most recent first. Ensure that your navigation and search allows users to quickly and easily find what they want.

Step 5 - Let users edit their listings

frontend editing of user submitted contentAllowing your users to edit and update their own entries is essential. This can easily be done with a View that is filtered by the current user.

You should also include a deletelink so listings that have sold, or are no longer valid can be easily removed by the user.

Read more: How to make flexible WordPress classified ads with your forms

Bonus step - Auto expire the user submitted posts

Pay-per-post sites work in multiple ways. Some pay once for a lifetime post, others require renewal to keep the post published, or simply remove the post after 30 days. The form action automation add on will conditionally trigger an API call. That API call will change the status of the post back to draft.

Pretty awesome right? Wait though - it gets even better!

Similar pay-per-post systems can use Views instead of posts. This has two major advantages:

  1. It's easier to build custom layouts for your listings.
  2. Built-in filtering options for easier auto-expiration listings after a set time period.

The process is very similar to what is shown above. Step 1 is the same, except the Post Status field should be a normal dropdown instead of the one added via the create post action. Step 2 can be skipped completely, and Step 3 remains the same.

Things change a little in step 4. Instead of creating a post, use a View instead.

The View type you need is Dynamic (both). Setup your main content to display an overview of your listings, with the most important information and an excerpt of the main text. Then the detail page contains the in-depth information.

The View gives you full control, allowing you to customize the HTML directly. Setup any layout you wish. For many business directories a single column layout may be preferable. But for a classified adverts site a three or four column layout often works best.

filter entries for pay-per-post WordPress site

Your View can now be filtered to exclude drafts and filtered by date, so only listings from the time period you specify are displayed.

Get started now

Not using Formidable Forms yet? Download the most powerful form creator and application builder today.

The post How to easily allow visitors to pay-per-post in WordPress appeared first on Formidable Forms.

Viewing all 521 articles
Browse latest View live